Showing posts with label Tutorial. Show all posts

Wednesday, February 29, 2012

Minky Giraffe Pants


LOVE these little pants I made for baby B. Super simple, very similar way of making it as the Made tutorial. I added ruffles to the bottom for some kicky flash :)

Thursday, January 5, 2012

Laundry Stand

Has anyone ever made one of Ana White's fabulous plans? They are so detailed an dwell layed out, they are awesome! We made the laundry stand, and it turn out perfect!


Isn't it lovely how quickly it "organizes" you! :)  Do note that to add the baskets, this stand is probably 5-6" taller than a standard laundry stand.

Isn't is lovely! We went for a clean look and left off the option trim that was shown in Ana White's plans. My sister-in-law used her cricut to cut the vinyl letters for me.


 And a quick shot of my awful laundry room...really wishing I had a room instead of the utility closet, but I'll take what I get :) and yes, my pictures come complete with dirty laundry in the baskets and clean in the dryer! ha!

Wednesday, November 16, 2011

Bubble Ballet Skirt


Bubble Ballet Skirt Tutorial

Supplies (for a 4T or smaller size):
 1/4 yard of knit
1/2 yard of chiffon
coordinating thread

A Bubble Ballet Skirt is so fun and easy to make!

General rule of thumb for width of the fabric would be 2-3 times the stomach circumference. My little girl is 19" around, and I just used the full 44". Cut the length to 18" long.

for a 19" waist, you could cut two pieces of fabric that are 19x18 to accomplish the same look!


fold the fabric in half the long way and again the short way, stitch up the side to form a circle


I used an overlock stich to prevent fraying.


Turn inside out.

I forgot a picture of the next 2 steps,

Take the raw edges of your skirt and line them up, serge or interlock stitch around the full circle to prevent the fabric from unraveling with wear.

1/2 inch from the top of the skirt sew a long stitch to use for gathering. If you are worried about your gathering stitch breaking when you gather it, then sew a second stitch 1/4 inch from the top and pull the bobbin thread on both stitches together when gathering.

Now for the band. Cut it 5" long, and the width will be Tummy circumference - 2", so my little girl was 17"


Fold in half the short way and stitch together using a knit stitch or a zig zag stitch.


fold in half the long way hiding the seam


Lining up the seams, pin together the knit waist band and the chiffon skirt together, evenly gathering the chiffon around as you go. Use a knit or zig zag stitch so that the thread will stretch with the waist band.


Now put the skirt on your little girl and let her dance circles around your living room!


Monday, November 7, 2011

Silky Cuddle Blanket

I love the minky and flannel together, so warm, soft, and cuddly. Perfect combination to snuggle with from newborn to toddler!


The Silky Cuddle Blanket

Supplies:
1 yard minky
1 yard flannel
1 package of silk binding

Finished size: (approximate) 38"x46"
  • Cut minky to 36"x44", square off the flannel, 1 yard should be approximately 36"x44"
  • Manually wrap the silk around the edges, this will give you the length needed. At each corner fold the edge up 2" so there is a total of a 4" loop at each corner. Add a seam allowance and cut so it matches the length you just measured.  
  • sew the ends of the silk together.
  •  Sandwich the satin between the flannel and minky, right sides together all raw edges matching up.
  •  to create the corner fold up the satin 2" at the corner, angle it and fold the other direction. You will have excess satin hanging out
  • Sort of ruffle the satin along the corner and pin the "sandwich" in place. Be careful that all folded edges of the corner are tucked neatly in and will NOT get caught in your sewing, however you do want to make sure that ALL of the raw edges get caught
  • Pin well!

  • Sew all along the edge leaving a 3-4" opening to flip the blanket right side out. Then stitch a narrow seam along the flannel/minky edge all the way around
  • All raw edges on the satin will be hidden, and you will only see the one seam where you sewed the edges together!

I have an embroidery machine, so I love to personalize the gift. You could also hand applique or hand embroider and design on


My 3, almost 4 year old fights my 8 month old for the blanket we have like this! Perfect for all little ages :)

Thursday, October 13, 2011

Onesie Dress Tutorial

A while back I made a sweet little onesie dress for Baby B...so far back that the dress is already packed away as an outgrown item!


Such a fun easy dress to make!


My fabric was 1.5X the width of the onesie waist and 9" long. I was using scraps, so this was all I had. If I were making it for real, make sure the fabric is at least 2X the width of the onesie, mine was a little "tight" around her legs!


1. I don't have a serger, so I used an overlock to seal the edge. I missed taking a picture, but then took a 4" piece of trim, folded it in half, and overlocked stitched the ends together. I then sewed the trim to the bottom of the skirt.
2. I placed the skirt 3" from the leg hole
3. Taking the non sewn side of you fabric panel, run gathering stitch and gather. Pin to the onesie and stitch in place.Place skirt so that wrong side of skirt fabric matches to the right side of the onesie, placed on there looking exactly as you want it to look in the end.
4. Fold the skirt up, we are doing a french seam to cover the raw edges. Stitch just so the raw edges are completely caught in the seam and will not be sticking out.
5. Fold the skirt back down and a perfect clean skirt!

I have seen other methods that would fold the onesie in half with the skirt fabric sandwiched inbetween, also giving a clean skirt without raw edeges, however that decreases the length of the onesie. I have long torso babies, so I prefer this method as it shorted the skirt fabric and not the onesie!


  Not a fan of pictures on this day!


Perfect ot play in my messy living room!

Monday, September 26, 2011

Rainbow Cupcakes

Prior to our Rainbow Birthday Party, we did a "friend" party for just my dolly, and I tested out Rainbow Cupcakes!


These didn't turn out perfect, but the girls loved them, and they were easy.


I only did 4 colors for this one, and used the standard liquid food coloring. If you compare to my rainbow cake, you will see how these definitely were not as brightly colored!


my colors were Red, Orange, Green, Blue...although the orange kind of blended with the red!

Another box mix, separate into 4 equal bowls and color.
Use a spoon to layer into cupcake pans. I tried bags, and found that harder than spooning.
I wasn't perfect with the layers, and they came out with a fun swirl effect.


Happy belated 4th Birthday, Dolly!

Monday, August 15, 2011

Color Block Dress

Last week I showed my Dolly's rainbow dress, this week is a colorblock dress tutorial for MOMMY!!

Here is an easy comfortable dress, whether you use it to run to the kids' soccer practice or to the beach as a cover up! It's SO easy to make!

Supplies needed:
  • Remember how over the past few years shirts have gotten longer (which I LOVE by the way), well if you are like me, then you have a drawer/closet full of those too short shirts left hanging around. Grab one!
  • You'll need a small amount of accent fabric,
  • about a yard of skirt fabric.
*I used approximately 3/8" seams throught the dress

Instructions:
1.  Cut your tank top at the height that you want the dress to be, accounting for seam allowance. I cut my dress 4" below the arm hole.

2.  Cut your middle band. I cut mine at 3", finished band ended up being between 2 and 2.5". You need to cut two pieces for bands, add a seam allowance so that the band is the same width as the tank top.
3. Sew the side seams of the middle band together.
4.  Attach the middle band to the tank top.

5. I purchased 60" knit and used the full width for the skirt. Cut in half and sew the two 30" wide pieces together to form the skirt.

6.  Set your stitch to as long as it will go and stitch a gathering stitch around the top of the skirt. Gather and pin to the skirt.

7. Stitch the skirt to the middle band using a knit stitch or zig-zag stitch to allow give to it so the seams don't break when it stretches!

The middle band should match width to the tank top, and the skirt is gathered as its attached to the middle band.

Use another dress that you like the length of as a guide to determine the length of this dress. Add an inch for hems before cutting. Or, try it on and measure how long you want the dress to be.
Always remember the simple rule: Measure Twice, Cut Once...maybe even try it on pinned prior to cutting...I did not do this, and ended up with my dress about an inch too short! HA! It was the perfect FINAL length, and therefore I didn't hem it :)  Luckily knit doesn't frame, it lays great, and so off I go!

*If you want to hem the bottom, then fold up 1/2", fold over another 1/2" and sew the seam for a nice clean edge!
had you seen my face in all the pictures my 5 year old so graciously took of me...you would have cut the head off of the picture too :)
** Check out the fabulous blogs I'm linking up with, I've listed them here: http://itssewforyou.blogspot.com/p/linky-partys.html
Including: http://todayscreativeblog.net/

Monday, August 8, 2011

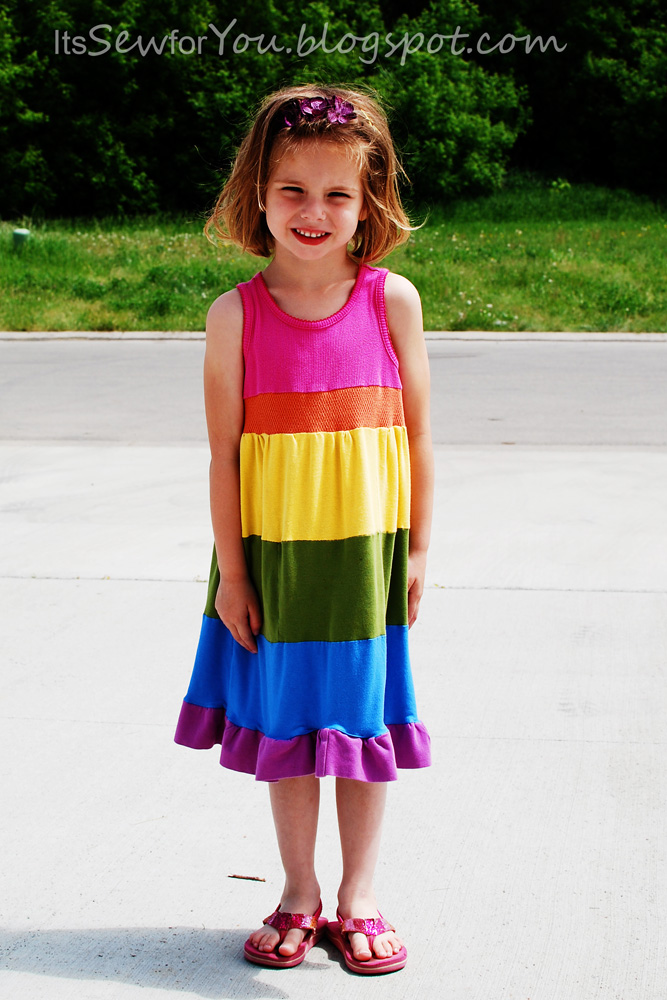
Upcycled Rainbow Dress

This was posted on Someday Crafts during her maternity leave...but I wanted to make sure I post it here too! This has to be hands down my daughters FAVORITE dress this summer! It barely makes it out of dryer before she is wearing it again!

My little girl loves rainbows right now. She usually refuses to wear anything I make her, but was begging for a rainbow dress, so I happily obliged!

This was such a FUN and EASY dress to make, and my Dolly loves it!

Supplies:
a tank that fits the child well
several old shirts/tanks for the dress

*Use a zig zag or stretch stitch around waist to avoid broken threads

I started with a pile of my old shirts and tanks and laid them out in order to get a feel for how it would look. This isn't your traditional primary color rainbow, but a bit of warmer tones!
  • I started by cutting the pink tank top 1" below the arm hole.
  •  I cut the next layer (orange) 2 1/2" and made sure the length (sewn together) matched the tank
  • Pin right sides together and stitch
 
Yellow, green, and blue were all cut at 4" and a width of 2x her waist. Some of my tanks weren't wide enough to do the width in two cuts, so there are multiple seams in each row!
  • Stitch these together
  • The Bottom Purple ruffle was cut at 5" tall and the width was 2 1/2 times her waist
  • Fold over for a clean seam on the bottom and sew the three edges together (two purples and the blue)
  • Sew a gathering stitch along the top yellow layer and pin to the orange band.
  • Sew together and you are finished!

These lengths worked perfectly for a 4T dress that hit my daughter just below the knee

Now go out and enjoy your day!

** Check out the fabulous blogs I'm linking up with, I've listed them here: http://itssewforyou.blogspot.com/p/linky-partys.html
Including: http://todayscreativeblog.net/

Friday, July 8, 2011

Birthday Banner {Free Printable}

Recently my little sister had a birthday. It just so happened that she and my parents were coming to visit on her birthday, so the kids and I got busy making a banner :)

So fun, so simple. i made the circles in photoshop, cut them out with a 2" hole punch, and taped them to ribbon!


Print your own birthday banner!

** Check out the fabulous blogs I'm linking up with, I've listed them here: http://itssewforyou.blogspot.com/p/linky-partys.html
Including: http://todayscreativeblog.net/

** Check out my Linky Party on Tuesday!
http://itssewforyou.blogspot.com/2011/02/its-sew-fun-tuesday.html

Friday, June 24, 2011

Drawstring Bag

I wanted a simple drawstring bag, so I used the Hobo Sack tutorial from Made's fabulous blog. So simple to follow, so cute.


simple to follow, my only comment would be, I used flannel for the bag and knit for the drawstrings, and it is a little difficult to pull and loosen. I think next time I'll use a cord for the drawstring!

** Check out the fabulous blogs I'm linking up with, I've listed them here: http://itssewforyou.blogspot.com/p/linky-partys.html
Including: http://todayscreativeblog.net/

** Check out my Linky Party on Tuesday!
http://itssewforyou.blogspot.com/2011/02/its-sew-fun-tuesday.html

Friday, June 17, 2011

Iron On Super Hero's


my kids have been begging for new shirts, but their requests were things I couldn't sew :)  I had some handy dandy iron on material in my supply drawer, so I thought I'd try that out! 

Supplies:
shirt
Printable Iron On Sheets (found at a hobby store or Wal-mart)

Directions:
We hopped on the internet and each kiddo got to pick out their picture, my Buddy wanted Super Hero Squad, and he was very particular on which characters had to be represented. My Dolly wanted a rainbow, and Hello Kitty, and lucky for us we found a picture with both!


I copied the pictures into photoshop to get them on paper and ready to print. Make sure to reverse the image if there is any writing or anything that needs to be a particular order. I flipped my picture appropriately, but when I had extra space and decided to make some size tags for the kids clothes, I of course for got to flip the sizes, oops!


Cut out the image and place it upside down on your shirt. Iron away according to package directions. I struggled with mine and it has sort of creases to it, but I think it just makes it look vintage and love it :)


Dolly wanted a yellow shirt, so Hello Kitty, who should be white, is now yellow :) 


This was one of the first "shoots" where the kids LOVED to model for me!


Not that you can tell by her face, ha!

He was so excited for a "boy" project!

and the goofiness comes out :)

** Check out the fabulous blogs I'm linking up with, I've listed them here: http://itssewforyou.blogspot.com/p/linky-partys.html
Including: http://todayscreativeblog.net/

** Check out my Linky Party on Tuesday!
http://itssewforyou.blogspot.com/2011/02/its-sew-fun-tuesday.html